


At PIT Solutions, we help businesses plan and execute seamless WooCommerce to Shopify migration projects with minimal disruption to operations and SEO performance. WooCommerce is a powerful, open-source e-commerce platform trusted by millions of businesses worldwide. Built on WordPress, it offers unmatched flexibility and a rich ecosystem of plugins, making it an excellent choice for merchants who value total control over their store.
As businesses scale, however, managing that flexibility can introduce new operational demands. Self-managed hosting, coordinating plugin updates, handling security patches, and maintaining performance during traffic peaks all require time and technical resources. Many growing merchants reach a point where they want to redirect that effort toward sales, marketing, and customer experience; and that is where Shopify offers a compelling path forward.
Shopify is a fully hosted, all-in-one e-commerce platform that manages infrastructure, security, and software updates automatically. This blog covers everything you need for a successful WooCommerce to Shopify migration; from understanding your options to launching your new store without losing data, SEO rankings, or customer trust.
This WooCommerce to Shopify migration guide explains how to plan, execute, and optimize a successful Shopify migration while preserving SEO performance, customer data, and business continuity.
Why Businesses Migrate from WooCommerce to Shopify
- Fully Managed Hosting
Shopify handles all server management, uptime monitoring, and infrastructure scaling. No hosting plans to manage, no performance tuning during traffic spikes — it is all taken care of automatically. - Built-in Security and PCI Compliance
Shopify meets the highest payment security standards with SSL and PCI compliance included by default. Customer and payment data are protected out of the box, without additional plugins or certificates. - Superior Performance at Scale
Shopify's infrastructure is purpose-built for e-commerce, delivering fast page load times and near-zero downtime even during high-traffic events like flash sales and seasonal promotions. - Intuitive, Business-Friendly Interface
Shopify's admin dashboard is designed for business owners. Managing products, orders, inventory, and analytics is straightforward for both technical and non-technical team members. - Centralized 24/7 Support
Shopify provides round-the-clock support via email, phone, and live chat — one platform, one support line, covering every aspect of your store with no need to chase multiple plugin vendors. - Powerful App Ecosystem
The Shopify App Store contains dedicated apps covering marketing, loyalty, analytics, fulfilment, reviews, and more. Most WooCommerce plugin use cases have direct, well-supported Shopify equivalents. - Transparent, Predictable Pricing
Shopify consolidates hosting, security, updates, and core features into a single monthly subscription, making financial planning simple and removing hidden costs spread across separate services. - Automatic Scalability
Whether you are processing ten orders a day or ten thousand, Shopify's architecture scales with your business automatically — no infrastructure changes required at any stage of growth.
WooCommerce vs Shopify: Key Differences
Both platforms are proven leaders in e-commerce. Understanding how they differ helps clarify what changes during migration and what to plan for.
| Feature | WooCommerce | Shopify |
| Hosting | Self-managed (you choose & maintain) | Fully managed by Shopify |
| Security & SSL | Plugin / third-party required | Built-in, PCI-compliant |
| Updates | Manual WordPress + plugin updates | Automatic platform updates |
| Support | Community / plugin-specific forums | 24/7 centralised support |
| Scalability | Manual hosting upgrades needed | Auto-scales with your business |
| Pricing Model | Open-source; costs spread across tools | Single monthly subscription |
| App Ecosystem | 50,000+ WordPress plugins | 8,000+ dedicated Shopify apps |
| Theme Flexibility | Full WordPress theme ecosystem | 100+ Shopify themes |
Benefits of WooCommerce to Shopify Migration
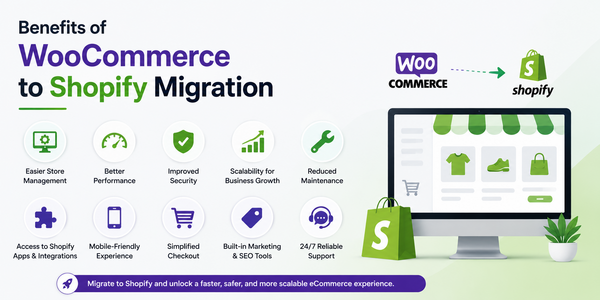
Migrating from WooCommerce to Shopify provides several advantages for businesses looking for a more streamlined and scalable eCommerce platform.
- Easier Store Management
Shopify offers a user-friendly admin panel that makes it easy to manage products, orders, customers, and discounts without requiring advanced technical knowledge. - Better Performance
Shopify provides optimized hosting and infrastructure, which helps improve website speed, stability, and overall store performance. - Improved Security
Shopify includes built-in security features such as SSL certificates, PCI compliance, and automatic updates, reducing the need for additional security management. - Scalability for Business Growth
Shopify is designed to support growing businesses with increasing traffic, larger product catalogs, and expanding sales operations. - Reduced Maintenance
Unlike WooCommerce, Shopify handles hosting, platform updates, and server maintenance automatically, allowing businesses to focus more on sales and operations. - Access to Shopify Apps and Integrations
Shopify offers a large app ecosystem that supports marketing, shipping, payments, inventory management, and other business operations. - Mobile-Friendly Shopping Experience
Most Shopify themes are responsive and optimized for mobile devices, helping provide a consistent user experience across all devices. - Simplified Checkout Process
Shopify provides an optimized checkout experience with integrated payment gateways and streamlined order processing, which can help improve conversions.
What Data Can Be Migrated to Shopify?
A complete WooCommerce to Shopify migration can move the following data:
- Products: titles, descriptions, images, SKUs, prices, variants, attributes, tags, and stock levels
- Collections: migrated from WooCommerce Categories as Shopify manual collections
- Customers: names, email addresses, billing and shipping addresses, account details
- Orders: complete order history including refunds, fulfilments, and guest checkouts
- Discounts / Coupons: migrated as Shopify Discounts (with some structural mapping required)
- Blog Posts and Pages: WordPress content pages and articles
- URL Redirects: URL Redirects can be generated automatically (depending on tool), but must be reviewed manually to ensure full SEO coverage.
- Custom Fields / Metafields: all WooCommerce custom fields carried over as Shopify Metafields
Best WooCommerce to Shopify Migration Methods
- Shopify Store Migration App
Shopify's built-in Store Migration app lets you select WooCommerce as your source and import products, customers, and orders via CSV directly within the Shopify Admin. Best for smaller, straightforward stores with standard data. - Manual CSV Export and Import
Export WooCommerce data using WP All Export or Import Export Suite, clean and map the CSV files, then import into Shopify. This method offers granular control over data structure. Best for merchants who want to carefully review and restructure data before importing. - Matrixify
Matrixify connects directly to the WooCommerce REST API — pulling data at the source rather than relying on CSV exports. This provides access to richer data, fewer formatting errors, and automatic mapping of custom WooCommerce fields to Shopify Metafields. It migrates products, collections, customers, orders, discounts, redirects, and blog posts in a single workflow. Best for medium to large stores or any store with complex data.
At PIT Solutions, Matrixify migration workflows are commonly used for medium and large-scale WooCommerce to Shopify migration projects that require accurate product, order, and SEO data transfer. - Professional Migration Services
For enterprise-level stores or deeply customized WooCommerce setups, a Shopify Expert or certified migration partner provides hands-on support with full data integrity and business continuity guaranteed. Best for large catalogues, complex integrations, or mission-critical migrations.
Step-by-Step WooCommerce to Shopify Migration Process
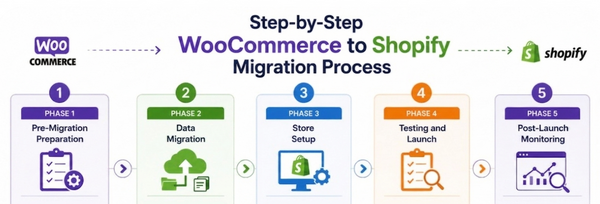
Phase 1: Pre-Migration Preparation
Step 1: Audit Your WooCommerce Store
Before anything else, document everything in your existing store — products, categories, customers, orders, active plugins, custom fields, and any SEO metadata (meta titles, meta descriptions, URL handles, alt text). This inventory defines your migration scope and surfaces gaps before they become problems. Also record your current baseline metrics: traffic, conversion rate, and revenue, so you can measure post-migration impact accurately.
Step 2: Back Up Your WooCommerce Store
Create a complete backup of your WooCommerce store before making any changes. Recommended tools: UpdraftPlus, All-in-One WP Migration, or WPVivid. Store backups in at least two separate locations — local and cloud. Keep your WooCommerce store live and untouched throughout the migration process.
Step 3: Create Your Shopify Store
Sign up for a Shopify account and choose a plan that suits your business. Once created, you will have access to the Shopify Admin — your central hub for the migration. Focus on data migration first; theme selection and design can follow once data is safely in place.
Step 4: Decide What to Migrate and How
Review your WooCommerce store and decide what data to move. A migration is a good opportunity to remove old or low-performing content and give your store a fresh start. Typical migration data includes:
- Products — titles, descriptions, images, variants, SKUs, pricing, stock levels, and SEO metadata
- Collections — from WooCommerce Categories
- Customers — names, emails, billing and shipping addresses
- Orders — full history including refunds and fulfilments
- Discounts and Coupons
- Blog posts and content pages
- URL redirects — to protect your SEO rankings
- SEO fields — meta titles, meta descriptions, URL handles, and image alt text
Choose a migration method: manual copy-paste, Shopify Store Migration app (early access), CSV import, or third-party apps such as Matrixify, LitExtension, or Cart2Cart. Third-party apps are strongly recommended for order history and SEO field migration, as Shopify does not support these natively.
Phase 2: Data Migration
Step 5: Connect WooCommerce to Matrixify via REST API
The correct and reliable way to connect Matrixify to your WooCommerce store is via the WooCommerce REST API endpoint — not by embedding credentials in a URL, which can be blocked by hosting firewalls, Cloudflare WAFs, or basic auth restrictions.
Generate WooCommerce REST API credentials: go to WordPress Admin → WooCommerce → Settings → Advanced → REST API → Add Key. Set Description (any name), User, and Permissions to Read. Click Generate API Key and save the Consumer Key and Consumer Secret — displayed only once.
In Matrixify, enter your store URL in this format : yourdomain.com/wp-json/wc/v3/
Then enter the Consumer Key and Consumer Secret separately inside Matrixify's credential fields. Do not embed credentials directly in the URL. Note: filtering by entity type (products, customers, etc.) is handled inside Matrixify's interface — not via URL parameters.
Step 6: Migrate Your Products
Using Matrixify, run your product migration. Before confirming the live import, check for products with high variant counts — Shopify has a hard limit of 100 variants and 3 options per product. Variable products with complex attribute combinations may need to be restructured. Matrixify handles this by combining extra options using a '|' separator, but review products with many variants in the Dry Run output before proceeding.
If using CSV: export from WooCommerce via Import Export Suite, edit the file to match Shopify's product CSV template, then import via Shopify Admin → Products → Import. Deselect 'Publish new products to all sales channels' if you want to review them before going live.
Step 7: Migrate Your Customers
Export customers from WooCommerce via Import Export Suite → Export → User/Customer. Include guest users if required. Name the file as WooCustomerDownload and export as CSV. Important: this file cannot be imported into Shopify without editing. Download Shopify's customer CSV template, map all fields to the correct Shopify columns, then import via Shopify Admin → Customers → Import.
Note: customer passwords cannot be migrated between platforms. Customers will be prompted to reset their password on first login to your Shopify store. Communicate this clearly in your launch announcement.
Step 8: Migrate Your Orders
Shopify does not support native direct order imports. Export orders from WooCommerce via Import Export Suite → Export → Orders. Name the file WooOrdersDownload. Then use Matrixify or another third-party app to import orders into Shopify. These tools preserve full order data: status, line items, shipping addresses, and refunds.
Before importing historical orders, disable both Staff Order Notifications AND Customer Order Notifications in Shopify Admin → Settings → Notifications. Without disabling both, Shopify will send 'order confirmed' emails to every customer for every historical order imported — which can number in the thousands.
Step 9: Migrate SEO Metadata
This step is frequently missed and causes long-term SEO damage if skipped. You must migrate the following SEO fields for all products, collections, and pages:
- Meta titles
- Meta descriptions
- URL handles (product and collection slugs)
- Image alt text
If your WooCommerce store uses Yoast SEO or RankMath, these fields are stored in the WordPress database and are accessible via Matrixify during migration. Ensure SEO fields are included in your Matrixify import configuration and verify them in the Import_Result.xlsx Dry Run output before the live import.
Step 10: Migrate Blog Posts and Pages
Blog posts and content pages do not migrate automatically with product and order data. Matrixify supports WordPress blog and page migration as a separate step — it migrates posts as Shopify Articles and pages as Shopify Pages, preserving content, images, and metadata. Refer to the Matrixify blog migration tutorial for the detailed process.
Step 11: Run a Dry Run and Review
In Matrixify, run the Dry Run option before any live import. This converts all WooCommerce data into a reviewable Excel file (Import_Result.xlsx) without creating anything in Shopify. Review each sheet carefully: Products (check variants, images, SEO fields), Collections, Customers, Orders, Discounts, and Redirects. Clean up any legacy or incomplete data before proceeding to the live import.
Step 12: Upload Description Images
The Dry Run ZIP file contains an Images folder. These are images embedded inside your product or collection HTML descriptions — not standalone product images. Manual upload to Shopify Files is only required if these description images do not resolve automatically during import (for example, if they are hosted on your old WordPress server which you plan to decommission).
If manual upload is needed: go to Shopify Admin → Content → Files and upload all images from the folder using Ctrl+A to select all. Do not rename the images — migrated description links depend on the original filenames.
Step 13: Run the Live Import
Once the Dry Run review is complete and all data looks correct, upload the reviewed Import_Result.xlsx into Matrixify without selecting Dry Run. Press Import to begin. The import runs on Matrixify's servers — you can close the browser and return later. A confirmation email is sent when complete. If any rows fail, check the Import Comment column in the results file and re-import only the failed rows.
Phase 3: Store Setup
Step 14: Choose and Customize a Shopify Theme
WooCommerce themes are not compatible with Shopify. A default theme is ready on your Themes page when you create your Shopify account. Browse the Shopify Theme Store for 100+ free and paid options. Use Shopify's drag-and-drop editor to customise colours, fonts, layouts, and key pages. This is an ideal opportunity to modernize your store's design while preserving the brand identity your customers recognize.
Note: support for paid third-party theme customizations is provided by the theme designer.
Step 15: Configure Payments, Shipping, and Taxes
- Payments: Set up Shopify Payments as your primary gateway — it is Shopify's built-in, fully integrated payment solution. For additional options, you can also enable PayPal or other third-party gateways. Note: Shopify Payments already uses Stripe as its underlying processor in most regions, so Stripe and Shopify Payments should not be listed as separate options for the same region.
- Shipping: Recreate your shipping zones, rates, and carrier integrations. Complex WooCommerce shipping rules may need to be manually rebuilt in Shopify's shipping settings.
- Taxes: Configure taxes in Shopify Admin → Settings → Taxes and Duties based on your region — GST, VAT, or applicable local tax rules. This step is critical and easy to overlook during migration.
Step 16: Configure Checkout and Email Notifications
- Checkout settings: Review Shopify Admin → Settings → Checkout. Configure guest checkout options, customer account requirements, and checkout fields to match your existing setup.
- Email notifications: Review and customise all automated email templates in Shopify Admin → Settings → Notifications — order confirmations, shipping updates, and account emails — to match your brand tone and design before going live.
Step 17: Add Legal Pages
Legal pages do not migrate automatically and must be created manually in Shopify. Go to Shopify Admin → Settings → Policies and add:
- Privacy Policy
- Terms of Service
- Refund and Return Policy
- Shipping Policy
Shopify provides boilerplate templates for each of these as a starting point. Customise them to reflect your actual business policies.
Step 18: Install Apps and Verify URL Redirects
- Apps: Map each active WooCommerce plugin to a Shopify App Store equivalent. Install only what you need to keep your store lean and performant from day one.
- URL Redirects: Confirm all 301 redirects are present in Shopify Admin → Online Store → Navigation → URL Redirects. If you used Matrixify, redirects for all products and collections are generated automatically. Scan for any gaps using Screaming Frog before launch.
Phase 4: Testing and Launch
Step 19: Test Everything Before Going Live
Before pointing your domain to Shopify, complete a full quality check:
- Place test orders and verify the complete checkout flow end-to-end
- Check all product listings — images, descriptions, pricing, variants, and SEO fields
- Verify customer accounts and historical order data
- Test all discount codes and confirm they work as expected
- Audit all URL redirects using Screaming Frog — fix any 404s before launch
- Check mobile responsiveness across multiple devices and browsers
- Connect Google Analytics and confirm tracking is active
- Review legal pages, checkout settings, and email notification templates
Step 20: Transfer Your Domain to Shopify
Update your DNS settings to point your domain to Shopify via Online Store → Domains. The required DNS records are:
- A Record: Point your root domain (@) to Shopify's IP address: 23.227.38.65
- CNAME Record: Point 'www' to shops.myshopify.com
Allow up to 48 hours for DNS propagation. Plan your go-live timing to minimise any transition window for customers. Once live, send a launch announcement to your customer base.
Phase 5: Post-Launch Monitoring
Step 21: Monitor SEO and Performance
- Submit your Shopify sitemap (yourdomain.com/sitemap.xml) to Google Search Console
- Monitor crawl coverage and track 404 errors and redirect gaps in the first 4 weeks
- Monitor keyword rankings to detect any SEO impact from the migration
- Track core metrics — traffic, conversion rate, and revenue — against your pre-migration baseline
- Review product listings and data accuracy; correct any migration issues promptly
- Keep your WooCommerce store live in read-only mode for at least 30 days as a safety net
Common WooCommerce Migration Challenges
Every platform migration involves structural differences between systems. Understanding these in advance lets you plan solutions before they become blockers.
| Challenge | Solution |
| Product variant limits (max 3 options / 100 variants in Shopify) | Matrixify combines extra options using '|' separators; use Metafields for additional attributes |
| URL structure differences — old WooCommerce URLs break | Set up 301 redirects for all products & collections; Matrixify generates these automatically |
| Order history — Shopify has no native direct order import | Use Matrixify or a third-party app; disable staff order notifications before importing |
| Coupon logic differences (exclude sale items, exclude categories) | Review Matrixify import warnings; manually recreate affected discount rules in Shopify |
| Plugin functionality gaps — no direct Shopify equivalent | Audit all plugins before migration; map each to a Shopify app or native Shopify feature |
| Data encoding issues in large CSV exports | Use UTF-8 encoding; prefer API-based tools like Matrixify to skip the CSV layer entirely |
| Custom WooCommerce fields — no default Shopify equivalent | Matrixify auto-maps all custom fields to Shopify Metafields — no data is lost |
What Does Not Migrate Automatically
Some elements of your WooCommerce store cannot be transferred through data migration tools and must be rebuilt manually in Shopify:
- Theme and Visual Design : WooCommerce themes are not compatible with Shopify. Your store's design needs to be rebuilt using a Shopify theme — a natural opportunity to refresh your look.
- Custom Plugin Functionality : Bespoke WooCommerce plugins or custom-coded features require equivalent Shopify apps or new custom development.
- WordPress Blog Content : Blog posts and pages require a separate migration step. Matrixify supports WordPress blog migration via a dedicated tutorial.
Customer Passwords : Password hashes cannot transfer between platforms. Customers will be prompted to reset their password on first login to your Shopify store. - Complex Shipping Rules : Advanced WooCommerce shipping configurations may need to be manually recreated in Shopify's shipping settings.
Full Migration Checklist
1. Pre-Migration
- Audit all WooCommerce data — products, customers, orders, plugins
- Map each active plugin to a Shopify app or native feature
- Back up WooCommerce store to at least two locations
- Record baseline traffic, conversion rate, and revenue metrics
- Create Shopify account and select an appropriate plan
2. Data Migration
- Generate WooCommerce REST API credentials (Read permissions)
- Connect WooCommerce via REST API endpoint
- Run Dry Run in Matrixify and download the Import_Result.xlsx
- Upload description images to Shopify Admin → Content → Files
- Review and clean the Import_Result.xlsx file (all sheets)
- Disable Staff Order Notifications in Shopify Settings
- Run the final live import in Matrixify
- Verify all imported data in Shopify Admin
3. Store Setup
- Select and customize a Shopify theme
- Configure payment gateways (Shopify Payments, Stripe, PayPal, etc.)
- Set up shipping zones, rates, and carrier integrations
- Install required apps as plugin replacements
- Verify all 301 URL redirects — scan with Screaming Frog
- Configure tax settings
4. Launch and After
- Place a test order through the full checkout flow
- Verify product listings, pricing, images, and discount codes
- Connect Google Analytics and confirm tracking
- Point domain to Shopify via Online Store → Domains
- Send customer announcement email with launch details
- Monitor Google Search Console for crawl errors (first 30 days)
- Track KPIs against pre-migration baseline
- Keep WooCommerce store live in read-only mode for 30 days
SEO Best Practices During Shopify Migration
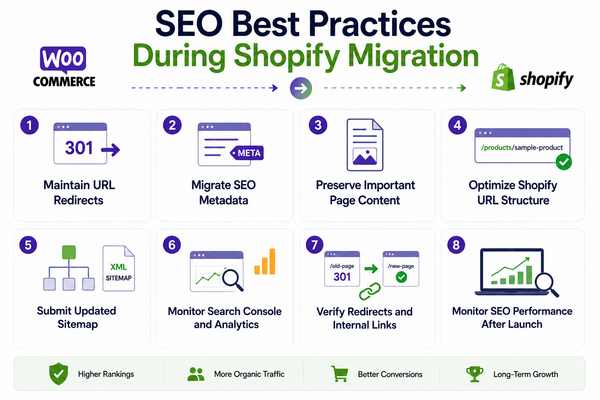
SEO should be carefully managed during a WooCommerce to Shopify migration to help maintain existing search rankings and organic traffic. Proper planning and validation can help reduce the risk of broken links, indexing issues, and traffic loss after launch.
- Maintain URL Redirects
Set up 301 redirects for important product, category, and page URLs to ensure visitors and search engines are directed to the correct Shopify pages after migration. - Migrate SEO Metadata
Ensure meta titles, meta descriptions, image alt text, and important SEO content are properly migrated from WooCommerce to Shopify. - Preserve Important Page Content
Review product descriptions, category content, blog posts, and landing pages to confirm that content formatting and SEO elements remain intact after migration. - Optimize Shopify URL Structure
Shopify uses a different URL structure compared to WooCommerce. Review URL handles carefully and keep them clean, relevant, and SEO-friendly wherever possible. - Submit Updated Sitemap
After launch, generate and submit the Shopify XML sitemap in Google Search Console to help search engines index the new store structure efficiently. - Monitor Search Console and Analytics
Track crawl errors, broken links, indexing issues, and traffic performance using Google Search Console and Google Analytics during the post-launch period. - Verify Redirects and Internal Links
Test important pages and internal links to ensure redirects are working correctly and users can navigate the store without encountering 404 errors. - Monitor SEO Performance After Launch
Compare rankings, organic traffic, and conversions against pre-migration benchmarks to identify and resolve any SEO-related issues quickly.
Why Choose PIT Solutions for Shopify Migration
A successful WooCommerce to Shopify migration requires careful planning, technical expertise, and a strong understanding of both platforms. Choosing the right migration partner helps ensure a smooth transition while minimizing operational disruption and protecting SEO performance.
PIT Solutions supports businesses throughout the complete Shopify migration process, from initial assessment and data migration to launch preparation and post-migration support. Our team works with both WooCommerce and Shopify platforms, helping businesses manage migration requirements, platform differences, and data mapping efficiently.
Our services include:
- WooCommerce to Shopify store migration
- Product, customer, and order data migration
- Matrixify-based migration implementation
- Shopify theme setup and configuration
- SEO migration and 301 redirect setup
- Shopify app integration and customization
- Migration testing and launch support
- Post-launch optimization and technical support
We follow a structured migration workflow that includes data validation, quality checks, SEO review, testing, and launch readiness verification to reduce migration risks and improve migration accuracy.
In addition to migration services, PIT Solutions also supports Shopify customization, integrations, performance optimization, and advanced Shopify solutions such as Shopify Headless Storefront with Hydrogen for businesses that require greater frontend flexibility and scalable storefront experiences.
Whether you are planning a standard Shopify migration or a large-scale WooCommerce to Shopify migration project, PIT Solutions can help you manage the transition with a reliable and scalable approach.
Talk to our Shopify experts to discuss your migration requirements and Shopify growth plans.