


Manual Configs Slowing You Down? Meet Terraform for Infrastructure as Code (IaC)
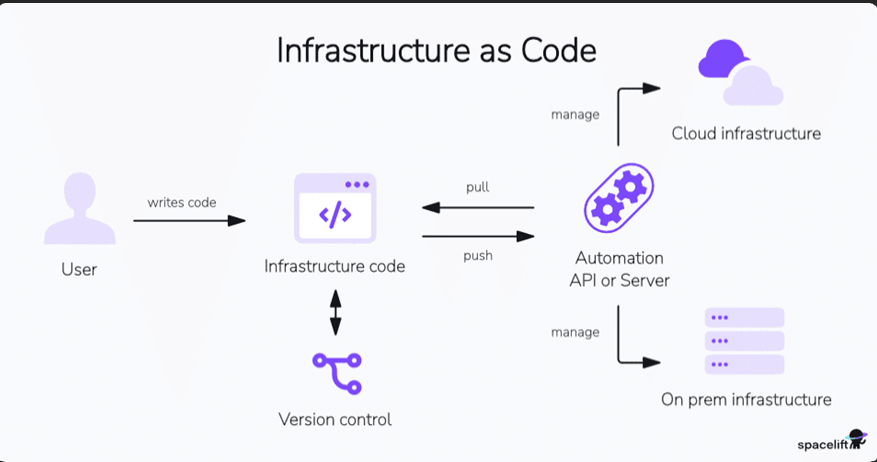
Infrastructure as Code (IaC) is a practice where infrastructure is managed and provisioned using code rather than manual processes. Like application code, the infrastructure code is stored in a version control system (VCS), ensuring that infrastructure changes are trackable and scalable. By defining infrastructure in descriptive, machine-readable files, IaC enables automation, consistency, and repeatability while reducing human error.
Why IaC Matters
Before the advent of IaC, infrastructure management was typically a manual and time-consuming process. System administrators and DevOps teams had to:
- Manually Configure Servers: Servers and other infrastructure components were often set up and configured manually, which could lead to inconsistencies and errors.
- Lack of Version Control: Infrastructure configurations were not typically version-controlled, making it difficult to track changes or revert to previous states.
- Documentation Heavy: Organizations relied heavily on documentation to record the steps and configurations required for different infrastructure setups. This documentation often became outdated quickly
- Limited Automation: Automation was limited to basic scripting, often lacking the robustness and flexibility offered by modern IaC tools.
- Slow Provisioning: Provisioning new resources or environments was a time-consuming process that involved multiple manual steps, leading to delays in project delivery.
IaC addresses these challenges by providing a systematic, automated, and code-driven approach to infrastructure management. Popular IaC tools include Terraform, AWS CloudFormation, Azure Resource Manager templates, among others. These tools enable organizations to define, deploy, and manage their infrastructure efficiently and consistently, making it easier to adapt to the dynamic needs of modern applications and services. This is particularly beneficial for businesses relying on Managed IT Services, DevOps Services, or Cloud Services.
Why choose Terraform
Terraform is an IaC tool that allows users to provision and manage infrastructure resources across various cloud platforms and on-premises environments. It uses declarative configuration files, written in HashiCorp Configuration Language (HCL) or JSON, to define and automate the lifecycle of resources, ensuring predictability and consistency. Terraform’s extensible plugin-based architecture supports many providers, enabling seamless integration and management of diverse infrastructure environments.
Benefits of using Terraform
Traditionally, cloud infrastructure was managed manually without IaC (Infrastructure as Code). This method was inefficient and prone to errors. Maintaining consistency was especially challenging when managing multiple servers and clusters. While configuration management tools were available, their infrastructure support was often limited.
In contrast, application code development has significantly evolved thanks to version control systems, DevOps toolchains, modern development practices, and delivery methodologies.
Terraform revolutionized infrastructure management by introducing the concept of Infrastructure as Code (IaC), which inherently takes advantage of these advancements to manage infrastructure more effectively.
- Multi-Cloud Support: Terraform is known for its multi-cloud support. It allows you to define infrastructure in a cloud-agnostic way, meaning you can use the same configuration code to provision resources on various cloud providers (AWS, Azure, Google Cloud, etc.) and even on-premises infrastructure. This flexibility can be beneficial if your organization uses multiple cloud providers or plans to migrate between them.
- Large Ecosystem: Terraform has a vast ecosystem of providers and modules contributed by both HashiCorp (the company behind Terraform) and the community. This means you can find pre-built modules and configurations for a wide range of services and infrastructure components, saving you time and effort in writing custom configurations.
- Declarative Syntax: Terraform uses declarative syntax, allowing you to specify the desired state of your infrastructure. This makes it easier to understand and maintain your code compared to imperative scripting languages.
- State Management: Terraform maintains a state file that tracks the current state of your infrastructure. This state file helps Terraform understand the differences between the desired and actual states of your infrastructure, enabling it to make informed decisions when you apply changes.
- Plan and Apply: Terraform’s “plan” and “apply” workflow allows you to preview changes before applying them. This helps prevent unexpected modifications to your infrastructure and provides an opportunity to review and approve changes before they are implemented.
- Community Support: Terraform has a large and active user community, which means you can find answers to common questions, troubleshooting tips, and a wealth of documentation and tutorials online.
- Integration with Other Tools: Terraform can be integrated with other DevOps and automation tools, such as Docker, Kubernetes, Ansible, and Jenkins, allowing you to create comprehensive automation pipelines.
- HCL Language: Terraform uses HashiCorp Configuration Language (HCL), which is designed specifically for defining infrastructure. It’s human-readable and expressive, making it easier for both developers and operators to work with.
Getting Started with Terraform
To get started with Terraform, it’s important to understand some key terminology and concepts. Here are some fundamental terms and explanations.
- Provider: A provider is a plugin for Terraform that defines and manages resources for a specific cloud or infrastructure platform. Examples of providers include AWS, Azure, Google Cloud, and many others. You configure providers in your Terraform code to interact with the desired infrastructure platform.
- Resource: A resource is a specific infrastructure component that you want to create and manage using Terraform. Resources can include virtual machines, databases, storage buckets, network components, and more. Each resource has a type and configuration parameters that you define in your Terraform code.
- Module: A module is a reusable and encapsulated unit of Terraform code. Modules allow you to package infrastructure configurations, making it easier to maintain, share, and reuse them across different parts of your infrastructure. Modules can be your own creations or come from the Terraform Registry, which hosts community-contributed modules.
- Configuration File: Terraform uses configuration files (often with a .tf extension) to define the desired infrastructure state. These files specify providers, resources, variables, and other settings. The primary configuration file is usually named tf, but you can use multiple configuration files as well.
- Variable: Variables in Terraform are placeholders for values that can be passed into your configurations. They make your code more flexible and reusable by allowing you to define values outside of your code and pass them in when you apply the Terraform configuration.
- Output: Outputs are values generated by Terraform after the infrastructure has been created or updated. Outputs are typically used to display information or provide values to other parts of your infrastructure stack.
- State File: Terraform maintains a state file (often named tfstate) that keeps track of the current state of your infrastructure. This file is crucial for Terraform to understand what resources have been created and what changes need to be made during updates.
![]()
Terraform cli commands
- terraform init – Initializes the Terraform configuration by downloading necessary provider plugins.
- terraform validate – Validates the syntax and configuration of your Terraform files.
- terraform plan – Shows a preview of the changes Terraform will make to your infrastructure.
- terraform apply – Applies the changes specified in the Terraform configuration to your infrastructure.
- terraform output – Displays the output values defined in your configuration.
- terraform destroy – Destroys the infrastructure managed by Terraform.
- terraform version – Displays the version of Terraform currently installed.
Configuring AWS for Terraform
Download Terraform on a Windows machine
Go to the official website of Terraform: https://www.terraform.io/.
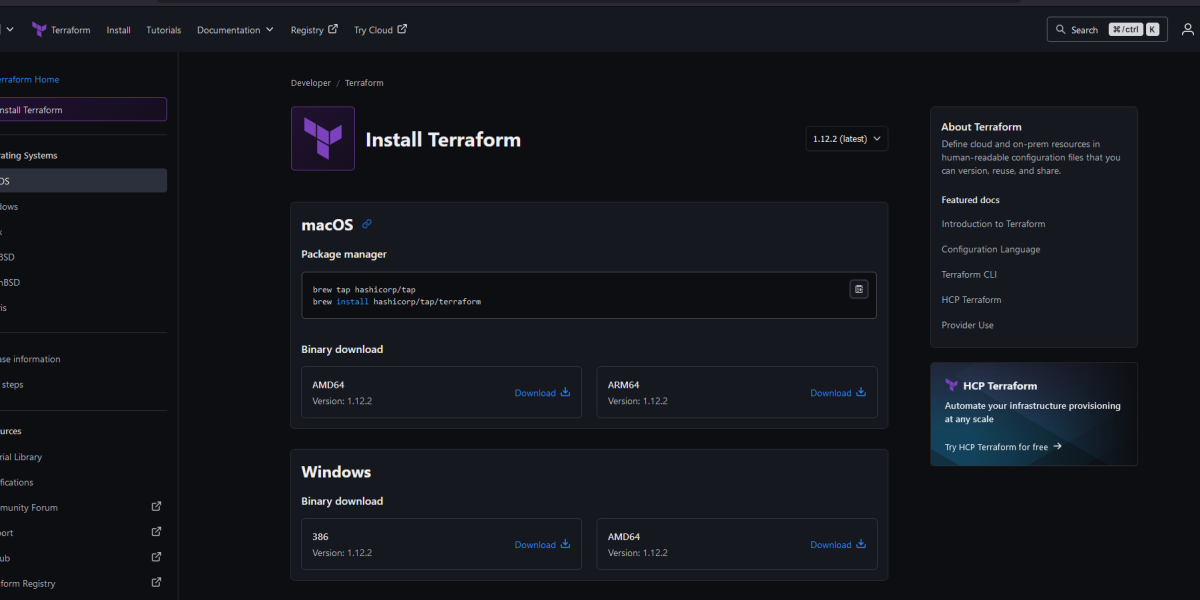
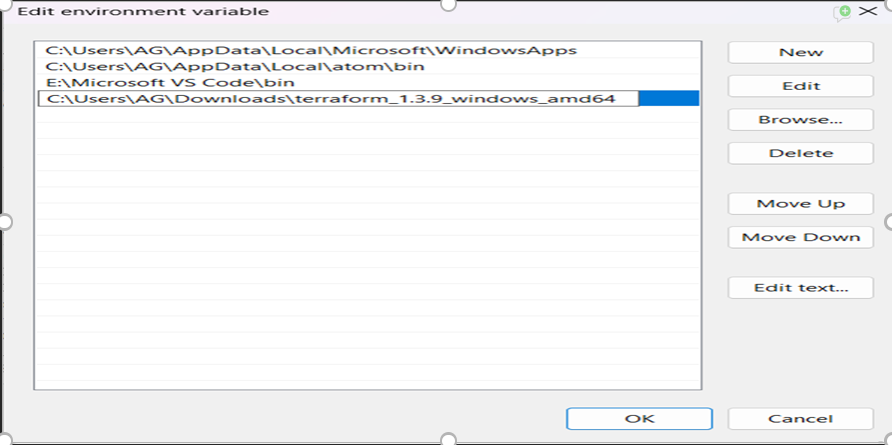
Click on Download, and then select the Windows tab, since we are downloading for a Windows machine. Then, select the AMD64 binary for downloading Terraform. Once you click on Download, a zip folder for Terraform gets downloaded on the local Windows machine. Unzip the folder and add the path of the binary to your Environment Variables.
Once done, open the Command Prompt and check the version of installed Terraform by using the command below:
Terraform version

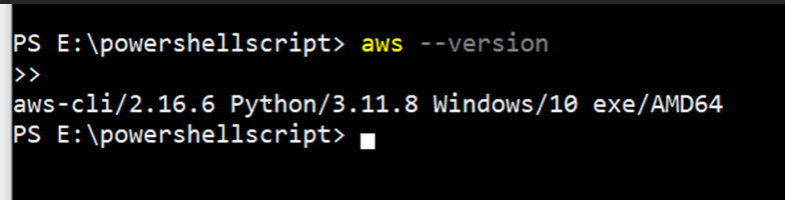
Download and Install AWS-CLI on Windows
Download and run the AWS CLI MSI installer for Windows: https://awscli.amazonaws.com/AWSCLIV2.msi
Once done, open the command prompt and check the version of the installed AWS CLI by using the command below:
aws –version
Here’s a breakdown of the steps we’ll cover:
- Writing the Terraform Configuration File: We’ll start by creating a Terraform configuration file (typically with a.tf extension) that describes the EC2 instance you want to provision. The configuration includes setting the AWS region, choosing an appropriate AMI (Amazon Machine Image), and selecting the instance type. Additionally, you can add metadata, such as tags, to the instance.
- Initializing the Terraform Working Directory: After creating the configuration file, we’ll use the terraform init command to initialize the Terraform working directory. This command downloads the necessary provider plugins and sets up the environment to interact with AWS.
- Planning the Infrastructure Changes: With the configuration in place, the next step is to run a terraform plan. This command generates an execution plan and shows a preview of the changes Terraform will apply to your AWS account. This step ensures that you understand exactly what changes will be made before they are executed.
- Applying the Configuration to Provision the EC2 Instance: After reviewing the plan, you can apply the changes by running terraform apply. This command provisions the EC2 instance on AWS as per the configuration you’ve defined.
- Managing and Modifying the EC2 Instance: Once the instance is created, you can manage its lifecycle using Terraform. This includes modifying, updating, or even destroying the instance if it is no longer needed.
➤ Create your Terraform configuration file
Create a terraform configuration file with .tf extension in HCL (Hashicorp Configuration Language). For creating an EC2 instance, we need to mention the AWS provider in the configuration file. So we first define the provider and then define the resource that is an EC2 instance with required parameters.
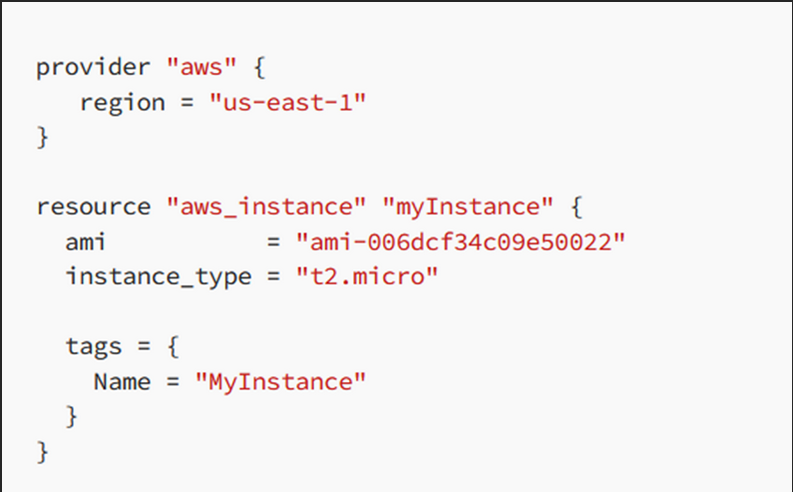
⧫ ProviderBlock
provider “aws” {
region = “us-east-1”
}
- This tells Terraform to use the AWS provider to manage resources.
- The region = “us-east-1” sets the region to US East (N. Virginia) for all AWS resources created in this configuration.
⧫ Resource Block
resource “aws_instance” “myInstance” {
ami= “ami-006dcf34c09e50022”
instance_type = “t2.micro”
tags = {
Name = “MyInstance”
}
}
This block defines an EC2 instance (a virtual server) resource.
- aws_instance:
Tells Terraform to create an EC2 instance. - “myInstance”:
This is the name you give this resource internally in Terraform.
· You can reference it elsewhere using aws_instance.myInstance. - ami = “ami-006dcf34c09e50022”:
This is the Amazon Machine Image (AMI) ID.
· It tells AWS what OS and pre-installed software to use. - instance_type = “t2.micro”:
Specifies the size and capacity of the EC2 instance. - tags:
Tags help identify or organize your resources.
· In this case, the instance gets a tag: Name = “MyInstance” which will show in the AWS EC2 console.
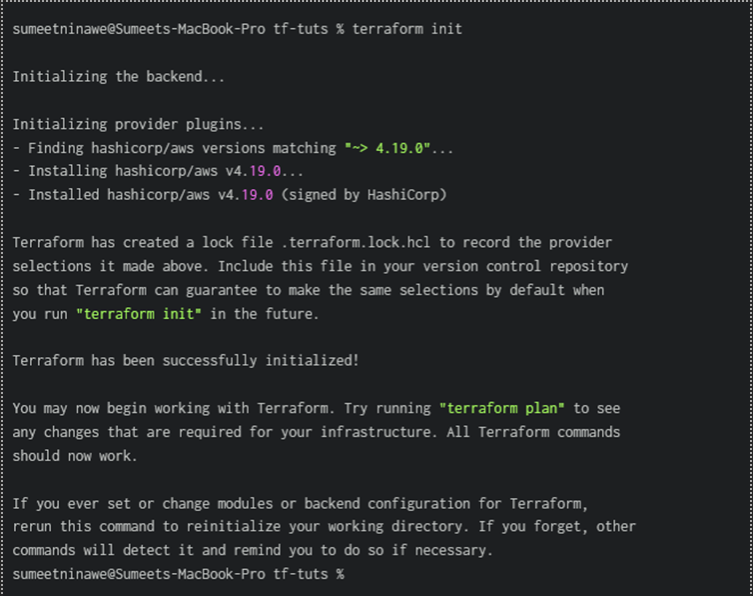
⧫ Initialize the Terraform working directory
Before actually creating the infrastructure, we first need to initialize the working directory. This can be done using the terraform init command. On running this command, it downloads all the required plugins necessary for building your infrastructure
➤ terraform init
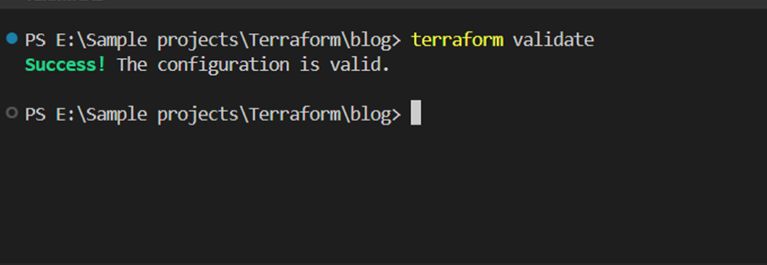
➤ terraform validate
To validate the configuration file, run the command below
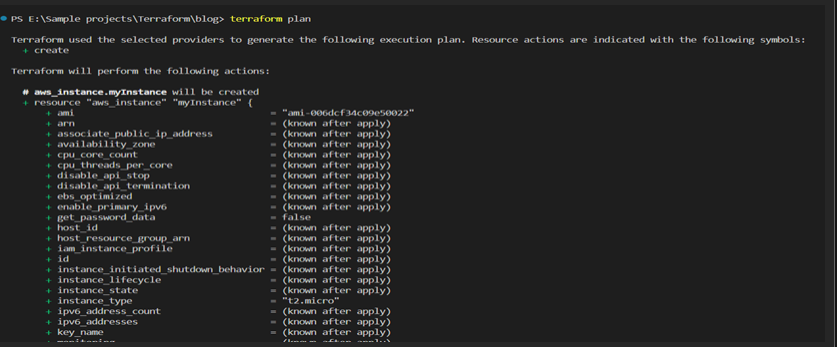
➤ terraform plan
Once done with the initialization and validation of the configuration file, run the command below to preview the changes before actually implementing them on AWS.
➤ terraform apply
Finally, run the command
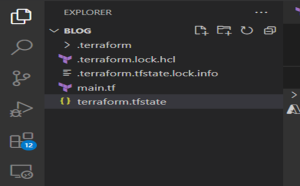
apply to deploy the infrastructure on the AWS cloud. This command creates the infrastructure that was previously planned. With this command, the terraform.tfstate file gets created, which keeps track of resources created using Terraform. This file is by default stored locally, but it can also be stored remotely
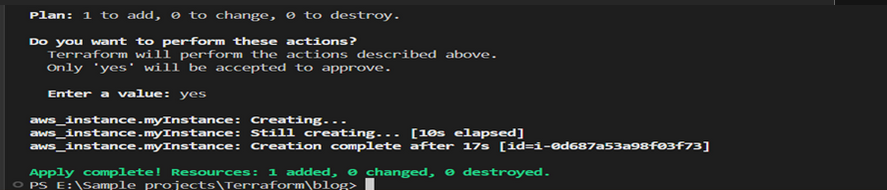
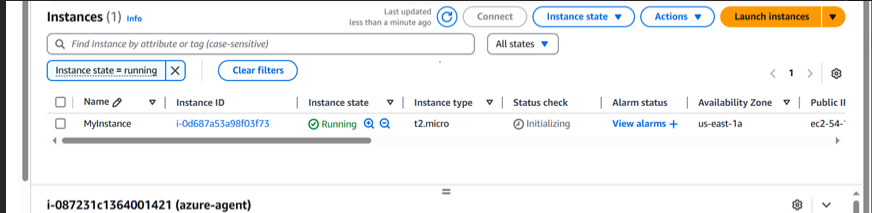
On executing this command, it asks for reconfirmation. Once you enter yes, it implements the desired changes. You can see the instance running in your AWS Management Console after the process of creation is completed.
Aws ec2-instance created successfully
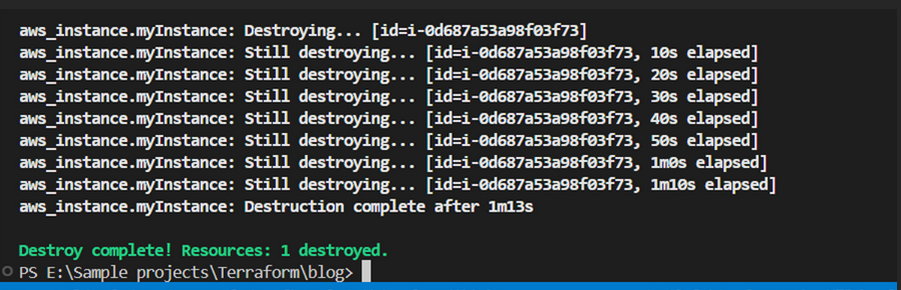
➤ terraform destroy
If you want to remove the infrastructure that we created using Terraform, you can use the command terraform destroy.
Conclusion
Infrastructure as Code (IaC) is transforming how companies build and manage cloud infrastructure, and Terraform is leading the way. With its clear syntax, multi-cloud support, and built-in state management, Terraform enables teams to create infrastructure that’s consistent, reliable, and easy to maintain.
Why Choose PIT Solutions for Terraform & IaC?
At PIT Solutions, we empower organizations with modern DevOps practices and infrastructure automation using Terraform and IaC. From cloud migration to scalable infrastructure design, our experts can help you achieve cost-effective and future-ready cloud solutions.
Get in touch with us to explore how we can simplify your operations and support your DevOps journey.